Showing posts with label Crafts. Show all posts

Tuesday, November 19, 2013

Quilting Bee

My friend, Candyce has made several quilts and offered to teach me how to make one. I purchased a jelly roll from etsy and set to work.
 

At home I sewed the jelly roll strips into groups of four. Because I was making a baby quilt I only needed 20 strips sewn into 5 groups.


Then I headed to Candyce's house. The kids had a play day and Candyce was my teacher. She help me cut the groups into block and then sew them on top of one another.


She kept showing me how to cut, press, sew, cut, press repeatedly until we had 12 blocks. This was my first attempt at pieced quilting and Candyce proved to be a great teacher!


After I left Candyce I came home and added a border to the top she helped me assemble. I looked online for directions for mitering corners and completed in the border in a short amount of time.


My next step was to put a call out on Facebook for a quilter to finish the top. I found a great lady that lives less than 10 miles from our house. If you have any idea where we live, it's amazing that someone who could provide the exact service I needed lived that close.


I selected a heart pattern and in just a few days received a call that the quilt was ready to be picked up.
 
I love the way all the materials came together and I can't wait to see a little girl wrapped in it.  I can't wait to make another!

We found the tutorial here


Tuesday, September 10, 2013

Write Them Upon Thy House

And thou shalt write them upon the posts of thy house, and on thy gates.
Deuteronomy 6:9
 
 
A few years ago I heard  a speaker at a homeschool conference give a workshop about being intentional. There was way too much covered in his workshop to go into detail in a single blog post, but one of his points was being intentional in the atmosphere of your home. He spoke of even the decor having a purpose . He and his wife had chosen to display objects on their walls of Biblical or Historical significance. There is nothing wrong with pretty pictures. We have several nice landscapes scenes hanging in our home. :-)
 
His point was that we could display things that were important. The children and myself spend a lot of time looking at our walls. We eat most of our meals here, we attend work/school here. The walls of our home can offer great influence over our thoughts.
 
I wanted to be more proactive in getting scripture into my children's heads. Over the last few years, I have found a few signs here and there that contained scripture which I wanted all of the members of my family to meditate.  If I could find a way to personalize scripture, that would be an even better use of our wall space.
 

Around the first of the year, I saw this verse on a large canvas. It was surrounded by foot prints. I made plans to create one for our home. Shortly after I gathered supplies, I learned we would be welcoming a new little one so I hated to make the canvas when it would be out of date in just a few months. I also realized that because we plan to leave the size of our family completely up to the Lord, I couldn't predict the size of canvas I would need to be able to include each future possible child.

For my birthday, my sister {Robin} created the above canvas with 3rd John 1:4 painted on it. I set to work creating the rest of the display.


I began by painting 8 x 10 canvases in the same blue color. Four of our children's footprints are so large, that an 8 x 10 was necessary. I found a great deal on a package of canvases at WalMart and purchased them there.


Then with Kent's help, I footprinted each child. After the paint was dry I let each kiddo, that could, write their own name.


The finished product was a large wall display with room for more! It's perfect for our growing family.


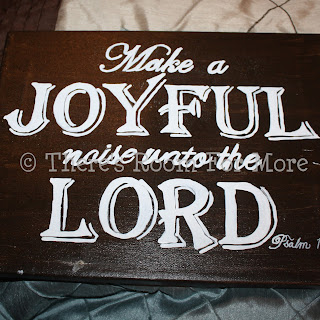
Because I had already purchased supplies, I wanted to complete another canvas. I also laid a coat of paint as the first step in creating this wall art. Kent and I discussed it and decided that we liked the slightly rustic look and depth that only one coat of paint gave the canvas.


The next step involved using Microsoft Publisher to create a document with the words I wanted to display. I had to play around with the fonts and size to get it to fit just right. After printing, I colored the back of the pages with chalk. Then using a pencil, I traced over each letter. I bought paint pens to do the writing but after a few letters they just weren't working. Instead, I found a fine point brush and painted the letters on. This canvas now hangs in the hall by the front door where our guitars hang.

This post is involved in linky parties on the following sites. Visit them tomorrow to find other great homemaking related posts.

   Welcome Home Wednesdays    

Friday, September 6, 2013

Carpentry is For the Birds


The kids were so excited when Mrs. Jennifer {and Mr. Dennis} gifted them with pre-cut pieces to make birdhouses. We had them for about a week before I found an opportunity to put them together and heard many requests to complete them now during that time.


Other than helping hold a few pieces while they drilled, the kids completed the entire project on their own. I have to admit, letting them have free rain to do projects as they please is a bit hard on this perfectionist mama. However, I have been really pleased with how much they've learned. If only the desire to clean up was a great as the desire to create, life would be perfect! :-)


I'm not sure which part they enjoyed the most, using Daddy's drill or playing in Mommy's paint. They assembled the houses and then set to sanding.


Once they sanding was done, the part I like best came next. It was really neat to see what they each come up with. Since they were planning to enter the birdhouses in the fair, I did lay a few ground rules like no names or auction company logos. Ben got past me and may have autographed his a few times before submitting it to the fair.


I'm not sure what look Ty was originally going for but his final design looked like a barn, complete with an "X" front door.


Madisyn gave her birdhouse a funky boutique look and it turned out to be really cute. We'll have to see if the judges like it as much as I'm sure our feathered friends will.

Thursday, September 5, 2013

All's Fair in Arts and Crafts


It was finally time to load up all the goodies the kids had been working on for the last few weeks. We headed to the fair grounds and despite our best efforts to complete paperwork beforehand, we still spent over 2 hours checking items in to their divisions.


It's been several years since the kids last exhibited craft items at the fair and I had forgotten a few things that would have made it go a little faster. Hopefully, I can remember them next year as we'll have 5 kiddos showcasing their talents and 3 little ones tagging along.


The kids worked hard and gathered quite a collection of items to display. They had everything from Christmas Favors, to Abstract Paintings, to Dolls and everything in between.


Madisyn has really been busy and even received some assistance from Nana. Her most prized entry was a pillow made from a campaign t-shirt when Papaw ran for County Judge. When he passed away, she pulled the shirt from her keepsake box and began talking about hanging it in her room.


I suggested that she upcycle it into a pillow. She decided to ask Nana to help her with the project. One afternoon she gathered her sewing machine and all the necessary supplies and headed to Nana's. I think it was a wonderful project for her to complete with Nana and they did a great job!


After we filled out the catalog of our entries, we headed to the 4-H section of the exhibit hall. Once again while the waited, the kids scoped out the competition. We have some very talented children in our area! We saw some amazing drawings and beautiful crafts.

After we completed all the paperwork, we loaded in the van and headed for home. Daddy treated us all to a Sonic drink. As he sat drinking his tea, Henry said "Thank you for the tea, Daddy. I would have rather had an ice cream cone, but it's OK." I can assure you, there is never a dull moment in our house or car!


Tuesday, September 3, 2013

Paint in a Bottle


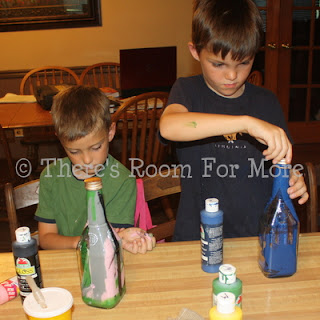
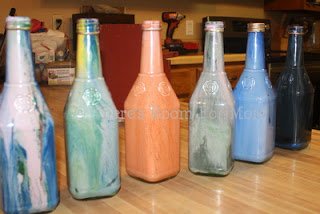
 Every year I learn a little more. Who knew that putting paint in a bottle was glass art? Luckily for my kiddos, the 4-H leaders knew and shared.


Not only did they tell us that we could paint glass and enter it in the fair but Mrs. Jennifer also gave us 6 bottles.


Mary Claire was so excited because we finally had a craft that she could do. Her bottle got lots and lots of pink.


The patient version of decorating a bottle includes adding paint a little at a time. However, the Witcher version means adding lots because more is always better. ;-)


The lids will have to be firmly attached because Mary Claire may have poured still wet paint out on the floor. I don't think that was supposed to happen!


Friday, August 30, 2013

Fit To Be Tie-Dyed


As part of our fair craft making, I decided to let the kids try their hands at tie-dying. I haven't tie dyed since my Brownie Girl Scout days, let's just say it's been awhile.


We bought a tie dye kit from Amazon and followed the directions carefully. One kit easily dyed our 7 shirts and I think we could have done an additional 3. I don't believe it would have come close to doing 15 adult shirts {per package directions}.  This kit had completely different directions than the method I used as a child. I much prefer this route. I remember boiling and only dying one color at a time. We also received a few pointers from Mrs. Jennifer.


After soaking the shirts in the soda ash, I wrung them out and gave each child their shirt in a disposable foil pan. The directions in the package gave a few folding techniques and I researched some on the Internet. The easiest folds seemed the be the spiral and roll. We wrapped lots of rubber bands around the shirts but they weren't tight, so none of our design came from the rubber bands.


Despite our efforts to make it as "un-messy" as possible we still managed to dye hands, feet, and clothing. Mary Claire didn't even get to make a shirt and still managed to get dye on her dress.


The gloves and smocks did help, but next time I'll set up a table and let everyone pull up a chair. The individual pans were a lifesaver. When we were finished I stacked them all together and dropped them in the outdoor trash can.


The nicest thing about the kit was the squirt bottles. I think it kept most of the kids {Ben excluded ;-)} from getting carried away with the dye. It came with three dye colors {Red, Blue and Yellow} and an empty bottle to mix another color. The kids voted and green was the winning fourth color. Of course, as a homeschooling mom I had to turn the color mixing process into a learning opportunity. In the future I'll have some additional bottles so we might be able to make some more colors.


We took turns passing each bottle around from youngest to oldest. Since I couldn't leave Mary Claire and Liberty out of the fun of matching shirts, I made one for each of them.


After the shirts were dyed to each child's desires, we tied them up tightly in WalMart sacks. The directions said to leave them for 12 - 24 hours. We left ours around 26 hours and unfolded them the next night after supper.


Mrs. Jennifer suggested we hang the shirts in trees to dry. I couldn't reach any of our tree limbs and pregnant ladies have no business on ladders :-), so we hung them in  the shop. I don't plan to wash them before the fair so the colors stay vibrant. Next time we head to the zoo or children's museum, be on the look out for the adorable kids in tie dye. :-)


 Henry's Shirt
 Ben's Shirt

 Griffin's Shirt

 Ty's Shirt
Madisyn's Shirt